Why & How to Knit a Swatch

While it can be difficult to muster the patience to knit a swatch, we promise, it is so worth it. This is particularly true if you're knitting garments that you would like to fit in a certain way...like sweaters! For this article we're giving you an overview on swatching and gauge. We'll also provide a few of our favorite tips and tricks to make your swatching successful. So whether you're brand new to knitting or more experienced, we hope this article motivates you to make a big and beautiful swatch for your next project.

Why Knit a Swatch?

If you're new to knitting and wondering what all this "gauge" and "swatch" stuff is all about, here's a quick overview of those terms for you, before we jump into the why and how.

A swatch is simply a rectangular piece of fabric that you knit prior to starting a pattern as a test. You do this for a few reasons: to see if you like the yarn, the drape, to see if the yarn bleeds, and very importantly, to test gauge.

Gauge is the number of stitches that fit into rows/rounds per inch. You'll find a suggested gauge in all knitting patterns, the goal is to match the pattern's gauge with your swatch gauge so that your knitting matches the look and final dimensions of the pattern. You may be wondering why you won't get the same gauge as the pattern if you use the same yarn weight and needle size - learn why your gauge may be different below.

TIP: If your gauge doesn't match just slightly we recommend altering the needle size or yarn weight up or down accordingly. If you have a significantly different gauge, this knit tutorial may do the trick for you "How to Modify Gauge"
 

1

Every Knitter Has Their Own Unique Tension

Have you heard someone say that they're a tight or loose knitter? How tightly or loosely you hold your yarn will affect your gauge. This is influenced not only by the style of knitting you practice but how you're feeling that day, what movie you're watching, what stitch you're knitting, and whether you're knitting in the round or flat (among many other potential factors). So, one of the main reasons you'll need to swatch is to learn your own unique tension tendencies. This is particularly true with patterned stitches such as our Sarah cardigan which features a lofty half-fisherman rib. This particular stitch can have tremendous variation so swatching is a must! But that's not just because of your tension, it's also because of how the yarn will react - learn about how yarn behavior affects gauge below. 

Pattern shown: Sarah knit in Fibre Co Lore, color Happiness. 

2

Every Yarn Behaves Differently

Another crucial element to your gauge is the yarn you choose. Most of us end up using a yarn different than called for in the pattern for our own unique look. This is great, but every yarn will act differently so you should get to know yours prior to casting on. Some yarn dyes may bleed (very helpful to test ahead of time!), some will be drapey while others quite lofty, and most importantly, some yarns grow after being knit. Because every yarn is unique in its fiber content, spin, construction, and dye, there's only one way to find out how the final knit will look...you got it - a swatch! There are some important tips and tricks we have so you're successful in swatching, read them below before you get started. 

Pattern shown: Emma (Version C) knit in Blue Sky Fibers Techno, color Smoke.

TIP: Because of the tube construction and alpaca fiber of this yarn, it "blooms" when blocked. Always make sure to wet block your swatch so the fibers can open and settle into their stitches. 

How to Knit an Accurate Swatch

The good news: knitting a swatch is a fairly quick task that could ultimately save you a ton of time. It's as easy as these three steps...

1

Knit a Rectangle at Least 6"x6"

Most patterns will call for gauge within a 4"x4" area. Because of the factors we mentioned above, your gauge may differ, for that reason we recommend shooting for at least a 6"x6" rectangle. Really, the bigger the better when it comes to accurate measurement later on. Always use the stitch pattern that will be most prevalent throughout the piece - your pattern will call out the stitch that should be measured. You're always working to replicate the tension of your final knit.

TIP: Some people have a different gauge knitting in the round rather than flat...and that is true of our boss lady herself, Julie. She's learned that she's a much looser purler. Her solution is so easy and genius. She uses Addi Clicks interchangeable needles and goes down one size smaller on the purl side. She will also do this while knitting her sweaters to get matching gauge throughout. 

2

Block Swatch

As we mentioned above, some yarns will grow or "bloom" once blocked. You may wonder "why block them at all?" well, they will eventually grow while you wear them. The weight of the garment matched with exposure to humidity, any cleaning, and the general elements of being worn will naturally expand the fibers over time. In addition, when you block your knits the fibers will open and relax together, smoothing out uneven stitches and allowing for the yarn's natural drape to come forward. The effects of blocking vary from yarn to yarn significantly, after some time you'll get a feel for yarns that will grow a lot to those that change minimally. 

TIP: Unsure about the blocking process? We have a knit tutorial to help you "How to Wet Block"

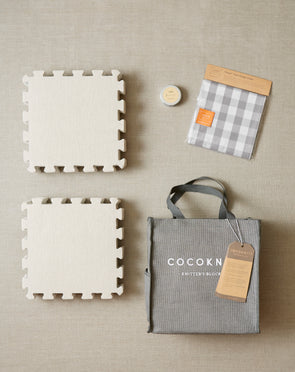
Pictured: Knitter's Block. This kit contains the essentials you need to block your swatch, all adorably contained in this sturdy jute bag. 

3

Measure Swatch

Now all you have to do is measure! We recommend using a metal measurer rather and fabric or plastic. When you have a sturdier ruler you can lightly press it into your knit to clearly see and count your stitches, while fabric or plastic can slightly move about while counting. Getting a precise stitch count is key, so we recommend always measuring stitches per 4" and double checking your measurement at another part of the swatch. Congrats on completing a swatch! Your final project will thank you. 

Pictured: Tape Measure

Comments

Cocoknits

Hi Fiona,
Yes, Julie always wet blocks her swatches because she wet blocks her sweaters.
Blocking for sweaters is different than blocking lace. With lace you will pull and stretch to open up the lace pattern. With sweaters you will only block to the measurements you knit the sweater to, often just patting the the pieces into place.
When you wet block your swatch, do not stretch it, but pat it and let it dry. See our tutorial “How to Wet Block” under Knitting Tutorials above.


Fiona King

I’ve been advised to wet block swatches. My question is do you think this is a good idea and I’m thinking surely if you pin a wet swatch to a blocking board when it dries it is bound to be the size it was pinned to which defeats the idea of knitting a swatch to find out if tension is correct ?


Cocoknits

Hi Susan, Yes, you do count the purl stitches in the rib. We’ve found that with this fabric it is critical to wash your swatch because it tends to spread out horizontally (so you get fewer stitches per 4" after you wash it). If you have been washing your swatches or need more help, feel free to email us at knit@cocoknits.com.


Susan Rodriguez

My question is how do you count your gauge stitches in the half fisherman’s rib for the Sarah. I have tried a 6,7,8 needle size using magpie dk swanky. So the question is do you just count the “V” or do you count the V and the hidden purl stitch. To get 14 stitches for 4 inches I am having trouble with the fabric looking loose and not puffy.

Thank you.


Cocoknits

Hi Jayne, Julie doesn’t find it necessary to swatch in the round because the Cocoknits Method begins with flat knitting. But if you want to double check that your in-the-round gauge is the same as your flat gauge, you can find lots of great video tutorials about swatching in the round on YouTube.


Jayne Bellows

How do you knit a swatch on the round. I often see swatches that have strings hanging from each side.


Cocoknits

Hi Janet, Welcome to the KAL! Have you blocked your swatch? You may find that the ribbing changes during blocking, so you will want to take that into account. If you want it looser after blocking, go ahead and use a larger needle, as long as you like the way the fabric looks. Feel free to email us at knit@cocoknits.com if you have more questions.


Janet Abel

Hello. I am swatching for the Toni KAL, using a colour block design and am finding that one colour-way knits up differently from the other two of the same yarn. Is this common? I’m using Woolstok Worsted from Blue Sky Fibres.
The one that knits differently will be the ribbing. I notice you don’t change needle size for this, but my ribbing does pull in a little, so am wondering about using different needle sizes, bigger for the ribbing.
Any advice on either issue?


Cocoknits

Hi Beverly, Yes. Sometimes you will find that a pattern gauge is given for Stockinette Stitch, even though the piece is knit in another stitch. In that case you are best knitting a swatch that includes 6" of the pattern st and 6" of st st. Hope that helps!


Beverly Snow

I have not specifically read that a swatch should be in the stitch pattern of the final piece, but I am assuming it should be. Can you confirm?


Cocoknits

Hi Susan, The listed gauge for Vintage is 4.5-5 sts/in, while the gauge for Franca is 4 st/in and Julie suggests that you knit it firmly, as the long cardigan can stretch. Check with the people at Wild and Wooly, but you may want to knit this at a tighter gauge—either with the size 8 needle, or whatever needle gets you the fabric you want. Julie will be adjusting the sweater pattern as she goes along because she is knitting it at 4.5 st/in. Between help from Wild and Wooly and Julie’s hints, you should be able to modify as you go along as well. Hope that helps and feel free to email us at knits@cocoknits.com with more questions.


Susan Alberto

I am Franca with Wild and Wooly in Mt Pleasant SC using Vintage by Berrico 52% acrylic 40% wool 8% nylon. I am trying to get a gauge I know I knot loose. 16 stitches by 24 rows on a 10 needle I get 4 1/4 by 5 inches. With a 9 I get 3 3/4 by 4 3/4 inches with a 8 I get 3 1/2 by 4 1/4 What size should I use


Leave a Comment

Your email address will not be published. Required fields are marked *

Please note, comments must be approved before they are published