
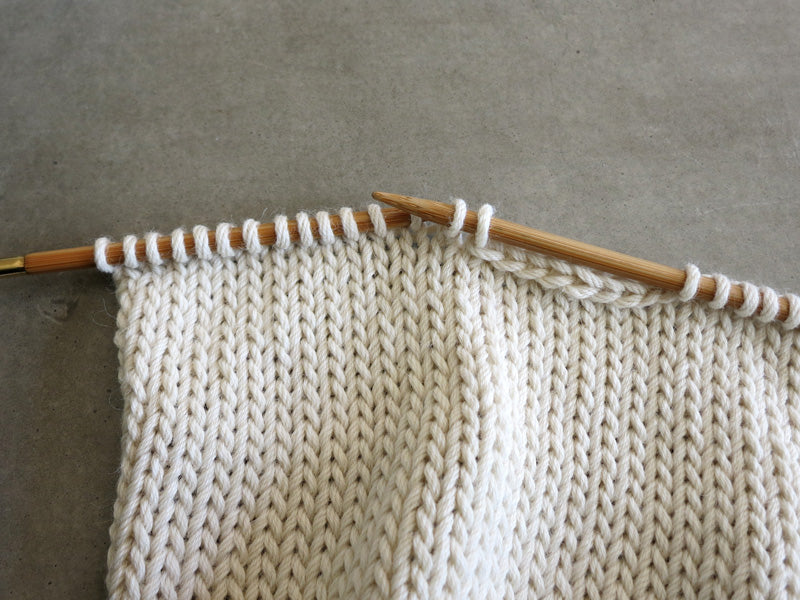
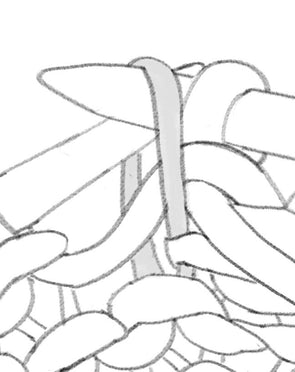
Every neckline should be as tidy as the one on the right. Unfortunately, most are written like the one on the left. Since I can't travel to every corner of the world to teach this in my European Finishing class, I'm posting instructions for the Proper Cocoknits Neckline for every knitter to use and enjoy
If you are leaving your neckline raw, these techniques are a must. Even if you are picking up stitches to finish the neckline, look how much easier picking up stitches will be around the neckline of the sample to the right. I have worked this sample in Stockinette stitch but the technique works just as well when working in stitch patterns.
These Cocoknits patterns use this technique; Leonie, Nieve, and Veronika.


Comments
Hi Pallavi, The Cocoknits Method doesn’t use back neck short rows, due to the way English Tailored shoulders are shaped, so we won’t be providing a tutorial for this. You may find that Julie’s tutorials for short rows help (search for short rows and bust darts on our website) or, if you have her book Cocoknits Sweater Workshop you could look at her description of short rows on Molly’s front. Otherwise, there are some great video tutorials about this technique on YouTube from designers who use short rows to shape the back neck that should help you out.
Thanks for your information. I’m still learning. I making a 10size sweater. I have62 std left after arm shape. I wonder how to calculate to use short rows on back neck shape and how many rows to do. I am aware of not to publish but you can send me emails or message. This will be my own use. Thanks.
Excellent tutorial. I wish I had this tutorial when I recently completed my first sweater since 1985! I was so disappointed with the jagged edge for the back. Now on my second sweater I have a beautiful professional looking bind off. Thank you so much. As someone who makes educational videos (music theory) your tutorial is fail proof. Excellent for the beginner as looking up Kf&b is easy to look up. Thank you so much.
Hi Denise, Usually in top down sweaters you don’t have a stair step situation to deal with. Julie’s Cocoknits Method sweaters have a smooth neckline. However, if you did have stair steps in a top down sweater, this method probably wouldn’t help, since it is done on the bind-off, not on the cast-on. Hope that helps!
Hi. This looks lovely and simple. Do you think it could be translated to Top-Down garments easily?
We’re so glad you love our tutorial! At the moment we have a long list of suggestions from fans. We’re happy to add yours to the list, but please know we’re prioritizing techniques that are used in our patterns.
This is fantastic! Would you all ever consider making this into a video?
Hi Tania, So glad you find the tutorials helpful! I’m not sure I understand your question – when you bind off on neckline finishing, you shouldn’t have the stair-step decreases that are common in shoulders and necklines. Check Julie’s tutorials on the bias bind-off and the V-neck neckline to see if those help. For more specific questions, feel free to email us at knit@cocoknits.com.
Hi, I’m so happy to have come across your site, it’s so exciting to find advice that changes the way you have been knitting for ages. I can’t wait to try some of your pattens. I have a question about a neckline I’m currently knitting and I came across your article about neat cast off edges. Could your tip k1f&b, be used along the edge simply for the declines before you cast off? Warmest wishes, Tania, UK
Very nice tutorial!
Hi Sarah, Since this is your first sweater, we suggest you follow the pattern exactly. Usually, if there is an extra row, it is balanced by an extra row on the other shoulder for the back. Hope that helps!
Hi again, sorry to be a nuisance. I don’t think my question was worded very well. Having completed the righthand side as worn, now about to start the lefthand side. The pattern as written (and this appears to be the case with all patterns), there is one extra row worked. If I were to join the yarn and work a knit row instead of a purl row on the lefthand side, the number of rows on each side would then be the same. I have no problem with the pattern I’m knitting or your instructions on how to make the neck much neater, that makes perfect sense and thankyou. Just wanting to know if an extra row matters. Apologies again. Sarah
Hi Sarah,
Use this tutorial in conjunction with the pattern for the sweater you are knitting. Julie is telling you how to adapt the pattern to avoid the stair steps, but you should use the instructions from your pattern to tell you how many to bind off, where to begin knitting, etc. Given that this is your first time, you are probably best to follow the designer’s instructions for the left and right sides of the neck, with Julie’s instructions and pictures to clarify how it is done and allow you to bind off more neatly.
Julie does each side individually, so check your pattern to see if it tells you to do them at the same time with two balls of yarn. You may want to do them one at a time, starting with the right front.
Thankyou so much for your instructions. I am not an experienced knitter and about to get to the point where I start shaping the neck on my first sweater. This may seem like a stupid question but, it appears there’s an extra row on the second side shaped. Does this matter and why not start with the right side facing to even up the number of rows? Many thanks.
I was so pleased to find this tutorial online. The instructions were clearly and simply stated and the photographs added to the clarity of each instruction. The example used “BO 3 sts once, 2 sts once, 1 st 3 times” was exactly what my pattern required me to do and I was at an absolute loss on how to proceed. You can imagine my delight in finding this guidance online.
Hi Sam, Yes, this will work fine in garter stitch. Be sure to bind off in the knit stitch on the right side and purl on the wrong side, so you will get the same “horizontal equivalent to a vertical selvage stitch” that Julie mentions here.
Does this same technique work for a sweater done in garter stitch? I am a new knitter and experimenting with my first neckline. The way my pattern outlines shaping the neck, I get the step ladder look, and yours is much prettier!
This tutorial saved the neck on my first sweater. I was stuck on the instruction (knit both sides) but I was able to use your tutorial to understand how to proceed and adapt the instructions to my pattern. Thank you so much!
I really enjoy coming back to this post and reading it for my future projects. I wanted to tell you “thank you” for such a detailed tutorial and very well made.
Thank you so much and God keep blessing your job.
Very nice and clear instructions!!
Thank you
Hi Doina, You shouldn’t be binding off the same stitch 3 times. I would suggest trying the instructions once more and if that doesn’t work, please email us at knit@cocoknits.com and we’ll be happy to help you figure it out.
I just tried this and I am having problems with the enlarged bias BO stitches especially when I have to BO 1 stitch 3 times . I am afraid this will leave holes when I pick up these for the neck band. Any help would be appreciated – as the pictures in the tutorial show a perfect neck line with no enlarged BOs.
Finally after 60 years of knitting a tutorial that will make my necklines beautiful. I can’t wait to use it
As someone who freestyle knits regularly, I have always been afraid to make a sweater. I recently made it to the neckline of my fair isle sweater and was at a complete loss. Your tutorial is one of the most thorough and useful knitting tutorials I have seen in a long time. Greatly appreciate your attention to detail! The technique described above has made my project look extremely professional.
Leave a Comment