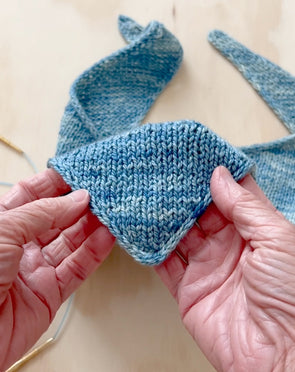
In this video Julie will teach you how to add 1 x 1 ribbing to a V-neck using mitered decreases. She'll demonstrate on an Emma Version A, but you could apply this technique to any sweater. We like to add this to patterns when the neckline is more open than we hoped. It's also a great way to clean up the look of a neckline if things got a bit messy.


Comments
I finally sent an email to you with photos of the jumper (sweater) that I plan to knit and the pattern that is closest to it, but missing the neckband. Appreciate any suggestions you may have now that you a visual! Thanks.
Hi Frances,
If you knit the ribbing back and forth from shoulder to shoulder, you will end up with a corner of ribbing sticking up at each side. You could attach them to the back of the neck, but this may not give you the look you want. Another way to add ribbing only to the front of the v-neck is to pick up stitches all the way around the neck, then use short rows to add ribbing to the front (and avoid the tab of ribbing sticking up at shoulder). You could then bind off in ribbing or otherwise on the back neck. Hope that helps! Feel free to email us at knit@cocoknits.com, including the Cocoknits pattern you are working on.
This is great, thank you! For the pullover that I am going to knit, however, there is no ribbing along the back…is the basic concept the same, with the exception of beginning on one shoulder and picking up along to the other shoulder? Thanks so much for the advice.
Great to hear!
Thankyou so much for your clear and helpful answers! I have gone back to watch the other video and have finally gathered the courage to tackle my new neckline – and it is all working out! your videos are the clearest I have found anywhere. Thanks again!
Hello,
Yes, you are knitting a round after the pick-up and during that round you can decrease as much as necessary. Note that by pick-up, Julie means put the stitches on a needle, but don’t knit them. See the “How to Pick-Up Stitches” tutorials for help with that.
While the total number of stitches around the neckline will be even to give the needed even number for the ribbing, the total number of stitches from the left shoulder, down to the point of the ribbing, and back up to the right shoulder will be odd, to allow for the single knit stitch at the point of the V. This means that the number of stitches on the back neck will need to be odd.
Hope that helps, and feel free to email us at knit@cocoknits.com if you have more questions.
Hi, I have a couple of questions about the video… are you decreasing stitches as you pick up around the neckline, or are you knitting one round before starting the rib pattern? Then when you mentioned the centre stitch, my jumper has an even number so the picked up stitch will be to one side… not in the centre? Thanks so much for your great instructions.
Hi Vera, We’re so glad! Thanks for letting us know. :)
So glad I found your site, I have been trying to find a clear
way to work a mitre at thr front of a sweater. This has
Proved difficult, but when I read your tutorial I understood how to do it as it was clearly demonstrated.
Many thanks
Hi Carol, Julie uses a standard bind-off in pattern (so for 1 × 1 rib, she k1, p1, pulls first stitch over second) for necklines. For the bottom of sweaters and sleeves, she likes Jeny’s Stretchy Bind-off using a much smaller needle. You can see her tutorial here: https://cocoknits.com/blogs/knit-tutorials/how-to-work-jenys-stretchy-bind-off
Very helpful video, thank you. What is your fav cast-off for ribbing on a neckline?
Leave a Comment