Julie's Toni

Our third annual Knit-a-Long looks a bit different than the last two. We have developed the Cocoknits Method Everlasting KAL, which allows you to make any Cocoknits Method Pattern of your choice, at any time, with all the helpful resources of a traditional KAL! Still, the Cocoknits team enjoys the tradition of starting off the new year by working on a shared pattern together. For 2022 we have decided on a fan favorite: Toni!

In this article, you can follow along with Julie as she knits away on her (fourth!) Toni over the course of eight weeks. Between January 28 and March 25, we'll be posting gradual updates on Julie's knitting process, with insights into how she modifies her Toni to make it uniquely her own. Be sure to watch our Instagram Highlights for an inside look at how her Toni grows.

You can watch Julie's entire process HERE on YouTube with accurate Closed Captions - over two hours of insider tips & tricks from Julie herself!

The Process

1

Week 1: January 28th - February 3rd

Prep Week!

Julie chose to knit her Toni in Rosa Pomar's Brusca, which she picked up in multiple colors (BC, 5A, 14A, 14C, 6B, 3C, C, and 10C) from her LYS, A Verb for Keeping Warm. She played around with yarn combinations, and decided to knit a color-block Version B, with the yarn held double for a marled effect.

Because she is holding her yarn double, her gauge is bigger than the pattern calls for. After knitting and washing her swatch, she measured (and re-measured) to achieve a gauge of 3.5 st per inch. Learn how you can easily modify your gauge like this in the tutorial "How to Modify Gauge." With this gauge she figured out that she needs to knit a size Small to achieve her desired bust circumference of about 45 inches.

TIP: Julie measured the bust and shoulder sizes of some of her most-worn garments to compare to her projected Toni size. She knows if she likes the size of her favorite hoodie, that's about the same size she wants her Toni!

Resources & Tutorials:

  • For all the Cocoknits Method know-how in one place: The Everlasting KAL 

  • Find helpful knit tutorials and more tips for this week in Prep Week

  • Want to see Julie in action? Check out our Instagram Highlight "Julie's Toni" for the best look at how her Toni is coming along! If you don't have Instagram, you can watch them HERE (on YouTube with accurate Closed Captions)

2

Week 2: February 4th - 10th

Sections 1-3 + Collar

Casting on! Julie knit Sections 1-3 of her Toni by creating the upper back, joining the collar, and picking up stitches for the shoulder and sleeves. (And since Section 1 is always a good time to double check gauge, she did that too!) She chose to knit the back of her ribbed collar in Brusca color 5A (gold) for a fun color detail, and held it double with AVFKW’s silk mohair, Frond, for an extra soft touch on the neck.

When picking up stitches for her Cocoknits Method shoulders and sleeves, Julie prefers to use a skinny double point needle (think US 0-2) so that the picked up bars slide on easily, and the stitches can be knit directly from the DPN. You can see how she does this in “How to Pick Up Stitches for the Cocoknits Method."

Julie finished Section 3 by placing the color-coordinated stitch markers in preparation for filling out her Cocoknits Sweater Worksheet!

TIP: Julie describes herself as a “lazy purler,” so her knit stitches tend to be tighter than her purl stitches. In stockinette, this is called “rowing out.” To avoid this, Julie knits with two different size needles when working flat: the correct size needle to achieve gauge for her knit rows, and one size smaller for her purl rows. You can watch Julie explain this HERE.

Resources & Tutorials:

  • For all the Cocoknits Method know-how in one place: The Everlasting KAL 

  • Find helpful knit tutorials and more tips for this week in Sections 1-3 and Collar

  • Want to see Julie in action? Check out our Instagram Highlight "Julie's Toni" for the best look at how her Toni is coming along! If you don't have Instagram, you can watch them HERE (on YouTube with accurate Closed Captions)

3

Weeks 3 & 4: February 11th - 24th

Filling out the Cocoknits Worksheet

Julie filled out her Cocoknits Sweater Worksheet, making a few adjustments to achieve her desired fit. (That’s the beauty of the Cocoknits Method – it’s easy to modify!) She omitted two rows from the Worksheet to slightly shorten the armhole depth, and adjusted her increase rate accordingly (you can watch her explain this HERE and HERE). She also removed a few increases from the front sections to create a somewhat less oversized fit.

After knitting about half of the Worksheet, Julie tried on her Toni yoke…and it fit perfectly! She then added in a new color, 3C (olive green), to begin her semi-improvised block striping. However, the fabric felt “stiff as a carpet,” so she switched to needles one size up from what she had been using. This loosened up the fabric a bit, which resulted in a more comfortable drape. She was sure to double check her math and make sure the slightly altered gauge would still achieve the measurements of a roomy but well-fitting “jacket” cardigan.

She followed her Worksheet to knit the rest of the yoke, and is ready for the next stage: separating the sleeves.

TIP: Hate weaving in ends? Julie likes to simplify her yarn joins by wet felting the ends together! When it’s time to add in the next skein, simply lay about three inches of the old and new yarns over each other, dab them with a little water, and vigorously  rub them together between your palms, generating a little friction heat. This will felt the ends together, joining them so that you don’t have any tails to weave in when you are finished! You can watch Julie do this HERENote: This will only be effective on non-superwash wools.

Resources & Tutorials:

  • For all the Cocoknits Method know-how in one place: The Everlasting KAL 

  • Find helpful knit tutorials and more tips for this week in Filling out the Cocoknits Worksheet

  • Want to see Julie in action? Check out our Instagram Highlight “Julie’s Toni” for the best look at how her Toni is coming along! If you don't have Instagram, you can watch them here (on YouTube with accurate Closed Captions)

4

Weeks 5 & 6: February 25th - March 10th

Sleeves & Body + Pockets

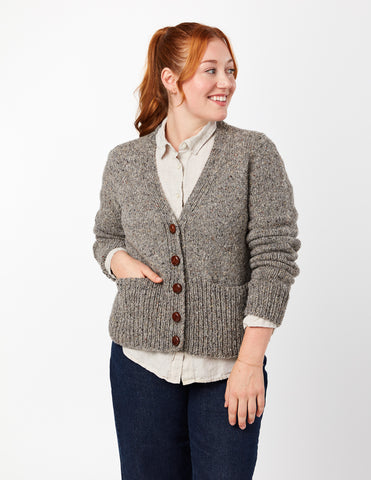
Julie finished knitting the yoke with her Cocoknits Worksheet (wahoo!), and separated the Sleeves & Body using her Leather Cord & Needle Stitch Holder Kit. After casting on the underarm stitches and knitting a few rounds on the body, she added in a new Brusca color, 10C (a dark teal-blue – gorgeous!). About 4 inches down from the underarm, she added bust darts.

Further down the body of her Toni, she added in colors 14A (pink), 14C (plum), and 6B (orange) in randomly inspired stripes. She deviated from the Version B of Toni to knit the bottom half of her sweater in stockinette, except for the bottom 3 inches of the hem which she knit in 1x1 ribbing.

Julie added in the pockets about 8 inches down from the underarm. She considered working a Version A patch pocket, but decided instead to skip the intarsia and match the pockets to the color striping of the body, and only do ribbing on the top 1 inch of the pocket. She also considered sewing in fabric as the lining of her pockets, but ultimately decided she preferred to knit her pocket linings as the pattern calls for and match them to the striping of the body as well.

She knit the sleeves using the Magic Loop technique, also matching them to the color striping of the body. She modified the sleeves slightly by skipping the last two sets of decreases, and then working those decreases all on one row once she got down to her cuff. This created a slightly blousy effect at the wrist. She matched the color of her cuffs and bottom hem to her back collar, 5A (gold).

She officially finished all the knitting of her sweater!!

TIP: At the same time that you make your buttonhole, add a Split Ring Marker or Opening Stitch Marker to the button band opposite your buttonhole (if your buttonhole is on the right front panel, add your marker to the left front panel). This will mark the row your buttonhole is on, so you can sew on your button in the exact right spot! You can watch Julie explain this here.

Resources & Tutorials:

  • For all the Cocoknits Method know-how in one place: The Everlasting KAL 

  • Find helpful knit tutorials and more tips for this week in Sleeves & Body and Pockets

  • Want to see Julie in action? Check out our Instagram Highlight “Julie’s Toni” for the best look at how her Toni is coming along! If you don't have Instagram, you can watch them here (on YouTube with accurate Closed Captions)

5

Weeks 7 & 8: March 11th - 25th

Finishing & Blocking

Julie finished her Toni cardigan! When she had completed all the knitting, she sewed down the pockets, seamed the collar and underarms, and wove in all the ends. Once the sweater was all tidy, Julie wet blocked. After it had dried, she sewed on her Mood Fabrics olive horn buttons with DMC embroidery floss in color 3032. 

Thank you for following along with Julie’s Toni! If you want to make a Toni for yourself - or any other Cocoknits Method Pattern – sign up for our Everlasting KAL emails for tons of helpful resources.

TIP: Want to be sure your pocket is sewn down in a perfectly straight line? Take a bit of contrasting scrap yarn and run it through the stitches on the body of your sweater that you will be attaching your pocket lining to. This will mark your path so you know exactly where to insert your needle. You can watch Julie do this here.

Resources & Tutorials:

Want to see Julie in action? Check out our Instagram Highlight “Julie’s Toni” for the best look at how her Toni is coming along! If you don't have Instagram, you can watch them here (on YouTube with accurate Closed Captions)

The Finished Toni

1

Ta-Da!

Julie's Toni seen here on a model.

Click here to watch Julie's entire process on YouTube - over two hours of content, including a walkthrough of her Worksheet, tips & tricks for modifications, and more.

Comments

Cocoknits

Thank you!


Pam

Wow! That’s a beautiful sweater. Love the color work. Congratulations on a masterful project.


Cocoknits

Hi Ilene, Be sure to sign up for the Everlasting KAL emails (under KAL at the top of the page). We’re releasing the information on Julie’s KAL on this page here as she works through, so you can expect her to talk about her worksheet in Week 3. Meantime, you can look at the general tutorial on filling out the worksheet in the Knit Tutorials under Learn at top of page. Enjoy!


Ilene

I missed the first Toni KAL and would like to join. Is Julie’s set up sheet with her entries available to see?


Leave a Comment

Your email address will not be published. Required fields are marked *

Please note, comments must be approved before they are published