Bust Darts are an amazing way to customize knit sweaters and cardigans to work with your curves. It's a great solution if you find your pieces riding up in the front. Many bustier knitters will knit a size up to accommodate for their chest. This isn't the best approach as other areas of the garment will likely be oversized, when in reality you just need to adjust that one area. Bust Darts are a great way to isolate ease just where you need it. Want to learn more about why you may want to add bust darts? Watch Julie explain why, here!
This tutorial is a general guide, but you can dive deep into the subject with Jillian Moreno and Amy R. Singer’s book, Big Girl Knits or through this Ravelry group: The Bust Line. We highly recommend both of these references if you'd like to perfect the art of customizing knit patterns to your body and preferences.


Comments
Hello! In addition to the resources mentioned in the article above, you will also find this Knitty article useful: https://knitty.com/ISSUEdf11/FEATgreatfit.php. Doing actual measurements of the person the sweater is for is the best way to decide how many short rows you want to add. Hope that helps!
Hi! You mention that the dart method is 4-6 extra rows for a b-c cup. How about for d cup? thanks!!!
Hi Monica,
Julie isn’t sure how well bust darts would work. She suggests trying the SWSRs on a swatch, working them on the plain knits and purls, not on the k1below sts. If it looks okay in the swatch, you can go ahead with the sweater. Also consider how roomy the top of Sarah is when deciding if you need them. Hope that helps!
HI. I am making the Cocoknits Sarah Sweater, which is in all-over half fisherman’s rib. I normally add bust darts to my sweaters, following Julie’s technique. How would one do that in half fisherman’s rib, or would Julie advise against it, since the textured pattern would be too interrupted. Let me know! thanks.
Thank you for this!
Hi Anna,
Using the Jesse pattern as an example, we think it would be best to hide the short row turns in the reverse stockinette in the cable panels. Then from that point on, the cables will be at different points in their charts, but that shouldn’t be a problem. Hope that helps!
How do you do bust darts when you have three cables, running down the front from a V-neck?
Hi Cat, there is no way to do it without it showing in the changing width of the stripes between the front and sides of the sweater. If you wanted to ease in a few short rows in a couple of the 10-row stripes, so that they were wider in the middle and narrower at the sides, that could work without looking too odd, but doing 8 in one of the 10-row stripes would mean you had only two rows in that stripe under the arm and in the back. Hope that helps!
hello! wondering how I could incorporate bust darts with a 10 MC 2 CC striped pattern? I was thinking of doing about 10-12 added rows to accommodate for a larger bust. Thank you!
Hi Felicia, It depends on how deep the V is and where on the sweater the joining occurs. Feel free to email us at knit@cocoknits.com telling us the specific Cocoknits pattern you are knitting and if you want to put the neckline in a different place than the pattern suggests. Enjoy your knitting!
I’m knitting a top down V neck sweater. Would you recommend making bust darts before or after jointing it together?
I thought the video was excellent. It was helpful to see the “before & after” on the mannequin.
Hi Kate,
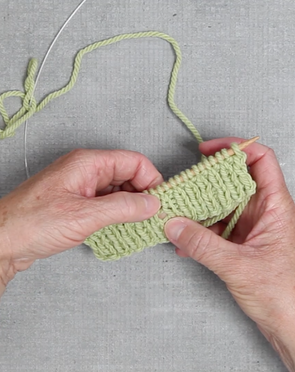
Julie tells you to purl back when she is doing the short rows on the left front of sweater. In this case you purl back to the front edge. If you are doing the short rows on a pullover, you would turn and purl back to the Shadow Wrap and purl it together, then continue until the next turn (5 sts in this example), do your Shadow Wrap Short Row (SWSR) and turn. You will be purling on the Wrong/in side of the sweater and knitting on the Right side to create stockinette stitch.
The places Julie turns in the example are not random. She chose to put the marker defining the turning point closest to the front at 10 sts toward the front from the underarm marker. She did her first Shadow Wrap Short Row (SWSR) at that first marker, her next SWSR 5 sts (half the dart sts) in, and the final SWSR at the underarm. This created a total of 6 short rows in the dart. If you wanted to add more room, you might choose to add 8 short rows and divide the 10 sts by 3 so that you had a total of 4 short row turns.
There is more information in the book, if you’d like to learn more.
Your instructions are very vague and dont make any sense. Purl back to where? Why did you set aside 10stchs but you pick random spots to do a wrap and turn? Then you say in a pullover purl to the other side – so instead of knitting i just start purling? Wont that affect my pattern? And why do that – how does purling create bust darts. Maybe you don’t understand it yourself well enough to explain it
Very helpful to see this on a dress form. Thank you!
Hi Megan, This technique will work well with a little modification.
Consider how much extra length you want in the stomach area by measuring the length over your stomach and comparing to the length over your back at the same place. This will give you a number of inches (you could also try on a different sweater and determine the number of extra inches you would have liked on it), which you will multiply by your row gauge to determine the number of short rows you want to add.
You will probably want to do the short rows in 2 or 3 groups, instead of all in one place, depending on the shape of your tummy. Otherwise, follow the instructions that Julie gives here, starting where you’d like the stomach darts to begin, rather than at the bust. Enjoy your new customized sweater!
How do I accommodate a stomach that begins to protrude below my bust line? I’m normal in the bust & short waisted.
Leave a Comment