Learn how to join a horizontal and vertical seam flawlessly with this tutorial by Julie. While it's quite simple (essentially a hybrid of the Blind Stitch/Mattress Stitch with a vertical to vertical/horizontal to horizontal seam) using the two stitches in one seam can be a little discombobulating, so this video will help orient you. You may be wondering, when would I need to implement this? For a handful of our Cocoknits Method patterns there's a collar where you'll need to join a vertical and horizontal seam. The collar is a stunning detail that will give your neck a clean and cozy edge. Scroll to the end of this tutorial to see the list of Cocoknits patterns with a collar and use this technique for your next project!
How to Join a Vertical to Horizontal Seam
Steps to Join a Vertical to Horizontal Seam

1
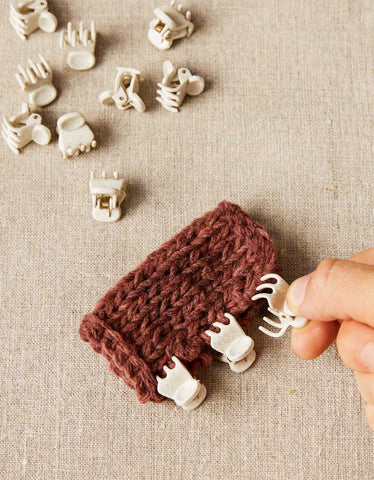
Set-Up
To set-up your seaming, lay the pieces flat and line everything up evenly. Try using claw clips to hold everything together to stay on track while you work. You may notice that the vertical piece has more give and can be stretched much longer than the horizontal piece. You can either eyeball it like Julie (using the claw clips makes this strategy much more accurate) assuming the ratio is somewhere around the average of 2 to 3. Or you can count all of your stitches/rows and mathematically figure out the proper ratio.

2
Vertical Edge Pick-Ups
For the vertical edge, you're using a Mattress/Blind Stitch. For the first pick-up go in between the first and second stitch and find two bars to pick up. If you're eyeballing the seam ratio, continue to alternate picking up one or two bars.
We recommend trying our Tapestry Needles while seaming. They're unique because they have a bent tip which slides easily through stitches, making the pick-up process much quicker.

3
Horizontal Edge Pick-Ups
For the horizontal edge you look for the "v"s going through the points where they come together at the bottom. Continue picking up only one v for every pick-up.

4
Pull Yarn for Even Tension
As you go, pull on the yarn to clean up the seam. If you pull too tight, simply loosen to the proper tension by gently pulling on the seam line. Once you're finished, Work in Ends with the Duplicate Stitch, and cut the tail with our yarn snips for the most delightful "snip, snip" sound to complete your project.
Here are 4 Patterns That Have a Collar to Seam:


5
Toni
You can follow this tutorial for Toni, but simply go into the bump of the garter stitch ridge rather that into the bar or ladder noted in the tutorial. To do this attaching Toni's collar, take your tapestry needle into the edge bump on the collar, then follow the instructions in the tutorial for seaming on the back. Each garter stitch ridge is two rows and garter stitch has more rows per inch than stockinette, so keep an eye on the ratio in case you need to go into a valley on the garter side occasionally. Check the last picture on the pattern page to see a closeup of this seam.

Leave a Comment