How to Knit Buttonholes

When teaching my finishing classes, I am often asked about working neat buttonholes. I’ve tried many different techniques over the years and never loved any of the results – they seemed to sag and stretch – so I often avoided buttonholes completely.

But then I tried my technique for a neat underarm bind-off (when knitting a sweater bottom-up) and found it resulted in a neat, almost invisible hole. This method also hides the holes in the valleys created by purl stitches on the right side. I’ve given directions for both a one-stitch buttonhole in k1, p1 rib and a two-stitch buttonhole in K2, P2 rib.
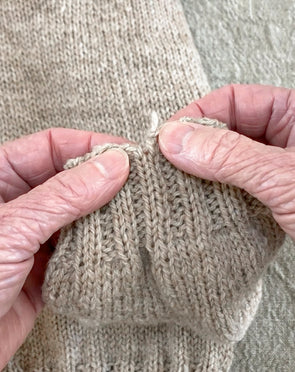
One-stitch buttonhole in K1, P1 rib

1

Step 1

Mark where you want to create buttonholes (these will be purl sts when looking at your RS).

2

Step 2

On RS, work in pattern to the k st before your marked/purl buttonhole st.

3

Step 3

Into this k st, kf&b.

4

Step 4

P your buttonhole st

5

Step 5

BO the purl st (using the extra st you made by knitting into the back of that knit st).

6

Step 6

Pass the resulting st from your right needle to your left needle.

7

Step 7

K2tog (the extra st with the next k st).

Continue in pattern until 1 st before the next buttonhole/purl st and repeat from Step 1 above.

In the next WS row, backwards loop CO 1 st over each of the BO purl sts.

Two-stitch buttonhole in K2, P2 rib

1

Step 1

Mark where you want to create buttonholes (these will be 2 purl sts when looking at your RS).

2

Step 2

On RS, work in pattern to the k st before your marked/purl buttonhole sts.

3

Step 3

Into this k st, Kf&b.

4

Step 4

P your buttonhole st

5

Step 5

BO the purl st (using the extra st you made by knitting into the back of that knit st). BO one more st purlwise.

6

Step 6

Pass the resulting st from your right needle to your left needle.

7

Step 7

K2tog (the extra st with the next k st).

Continue in pattern until 1 st before the next buttonhole/purl st and repeat from Step 1 above.

In the next WS row, backwards loop CO 1 st over each of the 2 BO purl sts. In the next RS row, when you come to the newly CO st, M1R p-wise into the extra slack of this CO.

Comments

Anonymous

Hi Rochelle, It is so dependent on the yarn you are using, there is no general rule. Your best bet is to add a part of your planned buttonhole band to your swatch—maybe even sewing your button choice onto the other side and experiment with buttoning and stretching it. That way you can decide what works best for your yarn, stitch pattern, and button. Hope that helps!


Rochelle

I have a question. How many stitches should you leave on each side of a horizontal buttonhole band?


Nancy in WA

Thank you, thank you!! This is brilliant and I’m so happy to be able to add this to my repertoire!


Leave a Comment

Your email address will not be published. Required fields are marked *

Please note, comments must be approved before they are published