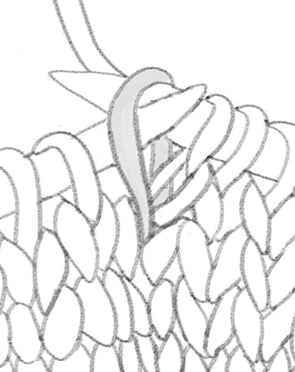
A cable increase is achieved by working a single cable with two kfb increases. Since they are worked over only four stitches, the cables can be worked either with or without a cable needle (yes, it's possible!). The purl bumps created by the kfb increases are cleverly hidden within the twist of the little cable, so the finished effect is neat and tidy, and the pleat-like cables add a touch of textural interest to an otherwise simple detail. In this tutorial, Julie will demonstrate both left- and right-twisting cable increases worked with and without a cable needle.
How to Knit a Cable Increase
Recommended Tools

1
Bamboo Cable Needle
For holding your stitches while working the cables (used by Julie in the tutorial).

2
Curved Cable Needle
An alternative cable needle style for holding your stitches while working the cables.

3
Stitch Markers
For marking where your increases begin. In the tutorial, Julie uses Colorful Ring Stitch Markers, but you can use whichever stitch markers you prefer.

4
Maker's Keep
For magnetically holding your small metal tools. All tools listed above are compatible!
Instructions
1
With a Cable Needle

A
Knit to first marker, slip marker.

B
Slip 2 stitches onto cable needle, holding in front.

C
Kfb twice.

D
K2 off cable needle.

E
Knit to 4 stitches before second marker.

F
Slip 2 stitches onto cable needle, holding in back.

G
K1, kfb.

H
From cable needle: kfb, k1.

I
Slip marker, knit to end.

J
Two cables created, and 4 stitches increased total.
2
Without a Cable Needle

A
Knit to first marker, slip marker.

B
Skipping the first and second stitches, insert RH needle into the third and fourth stitches from the back.

C
Pinch the base of all four stitches and carefully slide them off the LH needle. The first and second stitches will be free floating, the third and fourth stitches will be on the RH needle.

D
Immediately insert the LH needle into the first and second stitches from the front.

E
Place the third and fourth stitches back onto the LH needle.

F
Now you're ready to cable without a cable needle!

G
Kfb twice, k2.

H
Knit to 4 stitches before second marker.

I
Skipping the first and second stitches, insert RH needle into the third and fourth stitches from the front.

J
Pinch the base of all four stitches and carefully slide them off the LH needle. The first and second stitches will be free floating, the third and fourth stitches will be on the RH needle.

K
Immediately insert the LH needle into the first and second stitch from the back.

L
Place the third and fourth stitches back onto the LH needle.

M
K1, kfb twice, k1.

N
Slip marker, knit to end.

O
Two cables created (without a cable needle), and 4 stitches increased total.
Pattern That Uses Cable Increase

1
Andie
Cable Increases are used in the Cocoknits Method shoulder construction of Andie. Andie is everything you love about a classic pullover but with plenty of added personality: dramatic drop shoulders, full sleeves, oversized fit, and of course the little shoulder pleats. Top-down and seamless, this pattern is a pretty straightforward knit, but the results are anything but ordinary.
Leave a Comment