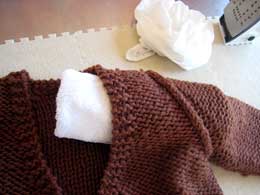
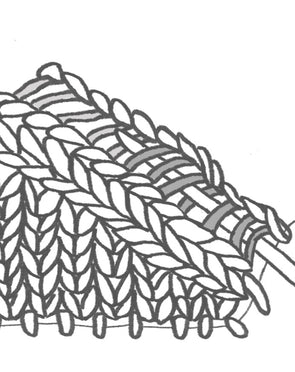
Blocking is the process of wetting or steaming your final pieces of knitting to set the finished size and even out the stitches.
You could use any flat surface to block your garments (I'm partial to the Knitter’s Block), just be sure that your knitted piece lies flat and fully dries so that its shape sets. Don't forget to check that moisture doesn't soak through and damage anything underneath it. (This has happened to me, which is why I developed the Knitter's Block — the blocks are backed with waterproof EVA so you can safely block on a bed, table or floor.)
Always block your finished pieces before seaming. By flattening and setting the shape of your pieces, you will be able to more easily line up your stitches to seam them together.
The fiber content of the yarn and the stitch pattern of your knitting will often determine how you block your finished pieces. Below you’ll find instructions on wet blocking, which is my preferred method.


Comments
Hi Jeni,
Yes, you can block it after sewing together.
Please feel free to email us at knit@cocoknits.com if you have a question about a Cocoknits pattern.
I knit a sweater but I did not block it before sewing it together can I still block it please e mail your response please thank you.
Hi Terri, Thank you for letting us know about your concerns here and by email. We have found that any slight warping can be fixed by rolling the Knitter’s Blocks back on themselves, the opposite way to how they are curved. Please let us know at knit@cocoknits.com if you find this does not take care of the problem. Thank you for your purchase!
The tutorial was helpful, but the Coco Knits blocking mats will not lay flat. When blocking, this causes the knitted item to have indentations where the blocks connect as well as bulges in the middle of the blocks since they do not lay flat.
Hi Paula,
That is River Wrap, available here on our website under Shop/Patterns and also available on Ravelry. Glad you like it!
I would like to have the pattern for the beautiful cable scarf in this article.
Hi Glynis, As you’ve figured out, the drying time can be quite variable: from 12-24 hours in a warm dry place with a fan blowing on it, to still damp in a week. Here are some of the variables that can shorten the time: get as much water out of the piece as you possibly can, maybe rolling it in a second towel after removing it from the first; point a fan at it; put it on something like the our Pop-Up Dryer so that there is air circulation on both sides (turn the piece partway through if you can’t); dry indoors in a heated room; and dry near (but not too near) a heat source like wood stove or radiator and away from humidifiers, fish tanks, and other things that add moisture to the air. Julie has created several products that help with this: the Pop-Up-Dryer, the Super-Absorbent Towel, the Knitter’s Block (which has a texture that allows some air circulation under the piece as it dries), and the Sweater Care Washing Bag. You can find these here on our website, or in your Local Yarn Store. Good luck!
How long does it typically take for a wet blocked item to dry? I haven’t tried before but I live in Northern Ireland so it’s rarely warm and sunny here and I imagine mine would still be wet/damp a week later.
Thanks for this great tutorial! For the steam blocking step, how thick of a cloth should you use for the wet blocking cloth? Tea towel vs. bath towel or something in between?
Hi Jayme, Wet blocking as described here will work fine for this yarn combination. If your mohair needs a little refreshing once it’s dry, our Sweater Care Brush, available at LYS and here on our website, will gently bring out the halo.
Any recommendations for the best technique for blocking merino wool held with mohair in a sweater?
Hi Pat, The Cocoknits Method produces garments in one piece, rather than in pieces, so the pictures show the blocking on Cocoknits Method sweaters. If you are knitting your sweater in pieces, blocking the pieces before seaming can make the process easier. Blocking works great on whole garments as well—this is what you will do when you wash your sweaters in the future.
When you said blocking before seaming, does it mean blocking each knitted piece separately? Your photos showed the garments already joined?
Also. If I have already put the pieces together into a completed garment, can it still be effectively blocked?
Hi Ruth, Julie likes to use a no-rinse wool wash like Eucalan or Soak, so no rinsing required. If you use a different mild soap, you will want to gently rinse, being careful not to change water temperature or agitate. Yes, you can block the whole sweater together, pinning out anything you think needs to be pinned. Both wet and steam blocking work. We prefer wet blocking if we have the time. Our blocking mats are designed to let some air in under the garment to help with drying. You could also flip the piece over once it has dried for a while if necessary. Hope that helps!
What a useful article! Just a couple of questions, firstly, do you soak the garment in plain tepid water or do you add soap and wash first, then rinse and block? Secondly, I am just finishing a child’s cardigan that is knitted all in one piece, so how do I successfully block the open edges, as these are the edges that are important to stay in shape? Is it OK to block in both front and back layers together, as I would hate the front to be ‘embossed’ on the back or vice versa; and would you recommend wet or steam blocking? Many thanks
Hi Amihan,
Glad you found the article helpful! If your pattern doesn’t have a schematic that you can get blocking measurements from, just use what you have and your personal preference. Pin the body of the sweater so that it is half the bust circumference wide and the length given from the shoulder to the bottom.. Pin the sleeves so that they will fit the person who will wear the sweater. Since cotton tends to be heavy and stretch, you don’t want to pull the sweater too much to achieve the desired length, because it will stretch while wearing. Hope that helps!
Hi ! I’m a beginner knitter and I’m making my first garment :> I don’t really know how to get the correct measurements I should pin to since my pattern just states the length and the bust circumference :( Does cotton block well too ? Your article was very helpful though ! Thank you !
Hi Joan,
We’re not sure what you mean by the blocking “rule,” but if you mean the blocking tiles, the textured surface should be up because it creates airflow under the piece. Hope that helps!
It’s not clear to me which side of the blocking rules should be up. Maybe it doesn’t matter.
Hi Sarah, Julie’s “How to Wet Block” Tutorial shows Julie supporting the sweater as she lifts it from the water. That should give you what you need :)
Hi
How do you stop the garment from stretching under its own weight when wet blocking? I don’t hang it at any point and just squish/press the water out of the pieces before laying out.
Hi Maureen,
If the yarn isn’t superwash, it is definitely worth trying again. Check for how this specific yarn behaves with blocking by looking it up on Ravelry or the internet.
If you blocked it too big, can you wet it and do it over again? The yarn is 100% wool.
Hi Kim,
That is Paulina, one of Julie’s earlier patterns.
Hi – can you tell me which pattern the little sweater in the second photo was made with? (The one next to Step 2: Blocking.) Thanks!
Leave a Comment