This yarn over (yo) short row technique is only used in a few Cocoknits patterns, like Veronika.
The Cocoknits preferred short row technique is the Shadow Wrap Short Row (SWSR). This is used in Cocoknits Method sweaters and other patterns.
This yarn over (yo) short row technique is only used in a few Cocoknits patterns, like Veronika.
The Cocoknits preferred short row technique is the Shadow Wrap Short Row (SWSR). This is used in Cocoknits Method sweaters and other patterns.
Here are the instructions for yo Short Rows.

If you are knitting along on the RS and the directions now say w&t for a short row


Don’t wrap and turn, but instead simply turn your work


And do a yarn-over onto the right needle


And now purl back.
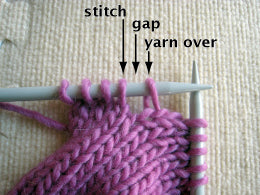
Can you see that the third st in on the rt needle is not a st, but a yo?


Okay, now here’s how it looks on a WS purl row. Here’s where you are supposed to w&t.


Instead, turn your work and do a yo onto the rt needle


And now knit back.
Again, do you see that the 4th st on the rt needle is just the loop of a yo?
Be careful not to count each yo as a stitch. If in doubt about whether a “stitch” is really a stitch or a yo, look carefully at the RS of your work.


If it is a stitch, you will be able to follow the v’s down the rows below it. But if it’s a yo, it will be coming out the side of a stitch without a row of v’s below it. If you study the picture above, do you see that the 4th st on the rt needle is really a yo? Another clue will be the big gap…when you come to one, you know that on one side or the other of that gap is a yo which will be used to close that gap. See it just to the right of the yo?
When you come back to those yo’s, you are going to work them together with the st next to them to close the gap you created by turning your work in the middle of a row, same idea as a wrap and turn, but easier to execute.


If on the RS you are knitting along and you come across this:
A yo, followed by the gap you need to close, followed by a knit st, you will perform a knit 2 together, knitting together the yo with the stitch in order to close that gap.


If on the WS you come across this:
The yo, followed by the gap to be closed, followed by a purl st, you will perform a ssp. [slip two sts separately as if to knit, slide those two sts back onto the left needle and purl them together through the back loops]


If on the RS you come across this:
A knit stitch, followed by the gap, followed by the yarn over, you will perform a ssk. [slip two sts separately as if to knit, put your left needle into their fronts and knit them together]


If on the WS you come across this:
The purl stitch, followed by the gap, followed by the yarn over, you will p2tog.


And if you do this, here is what your short rows will look like.
Completely invisible shaping!

Comments
The best explanation – with great photos – of the short row technique! I love it.
Hi Kath, this also works in the round (of course you are turning your knitting to do a short row, so that part isn’t in the round). When it is time to hide the yo, just identify which situation you have from Steps 9-13 and do as instructed. Hope that helps!
I love the simplicity of this! Will it be as hidden if used when knitting in the round, or would you need a different technique to close please?
I think you are twisting a stitch, your knit side doesn’t look right? I mean generally, not the short row stuff🤔
The BEST tutorial ever!! I know this, because I am self taught, and have been knitting for over 50 years! I have needed to read many, many tutorials to get this far. Your explanations are so very clear and your beautiful photos are excellent!
Will definitely be trying this instead of German short rows and other w&t techniques.
Thank you for your great tutorial
Hi June, Since that isn’t a Cocoknits pattern, we aren’t familiar with it. Perhaps you could get in touch with the designer, or look on YouTube for a basic explanation of how short rows work. They shouldn’t be decreasing your total number of stitches. Good luck!
I’m making sunshine coast. I did the short rows but did not get to the end of the round. Also you only have 61 stitches when done but I cast on 91. I’m really confused.
This is so beautiful! I was able to follow along step by step with the pictures (do not have yarn in hand right now). I wish I “spoke knitting” better to understand the difference between this method and W&T, but I’ll get to that another time! Thank you for this great tutorial.
Nice clear instruction. Great pics.
Nos 10 and 11 not clear at all I will have to search for a video or somewhere else to understand
Leave a Comment